How to Make a New Year Greeting Card in Photoshop
by 28 December, 2011 2:28 pm1

This is so much easy to go in a market and by paying some bucks; purchasing a New Year Greeting Card or any other festival card for your loving person but then it becomes just formality.
When you, by your own make any gift or card for your loving person that time your emotions and feelings get added into your work and your sweet person also can feel your love.
So my point is, now holiday seasons are going so instead of purchasing feelings by paying money this time why not to try some things that you can make by your own.
Yes, I know you don’t have much time and some of you not able to make by their own so instead going in a complicated work I am going to show you how to make your own greeting cards easily in Photoshop.
So let’s move to our work.
New Year greeting Card: Final Output

New Year greeting Card: Let’s Get Started
In this tutorial, I have used many smart techniques to achieve many little effects and it really suits to this work. So those techniques are not useful for just creating this type of greeting card you can use it anywhere while bringing any Photoshop effect. So learn the techniques carefully and use it at exact place.
Go ahead…
1. First take New Page in Photoshop by keeping Width: 1600, Height: 800 and Resolution: 200
It looks old fashion to have a 2 side (folded) greeting card and take full page and apply effect on it.
2. By the use of gradient tool, in a 1st Color Stop use this value: 0642ad and in a 2nd Use this: 4780bc
And then drag it on a page from right to left.

New Year greeting Card: 2012 Digit
3. First, by the use of Horizontal Type Tool, type 2012 by choosing a Font Georgia, Font Size 171. And then fill white color to it.

4. Now to stylize it, open the Blending Options by right clicking on the working layer.
And then you have to add effects such as Drop Shadow then Bevel and Emboss after that Gradient Overlay and then have to apply Stroke.
Before adding any effect through the Blending Options, you should go through the settings as shown in following images:
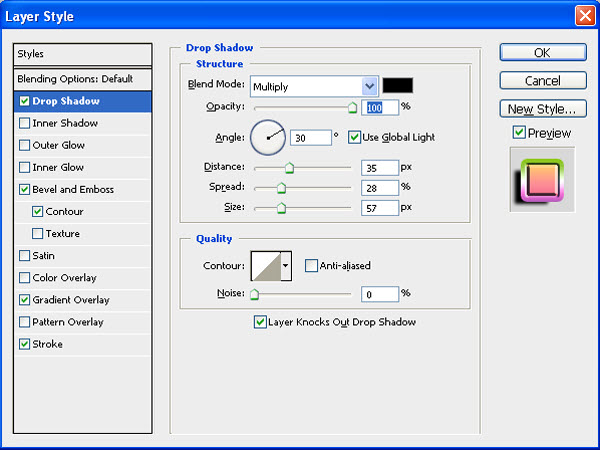
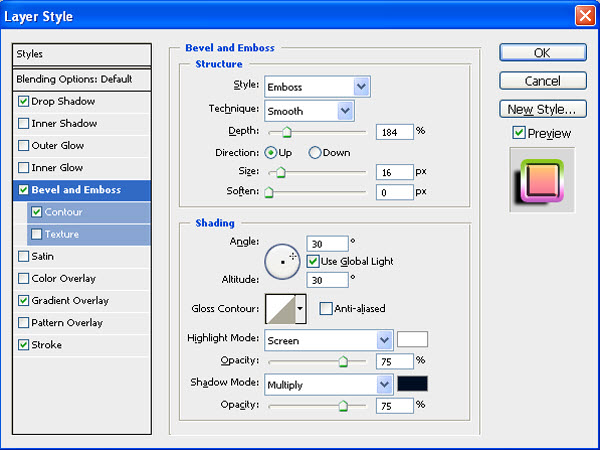
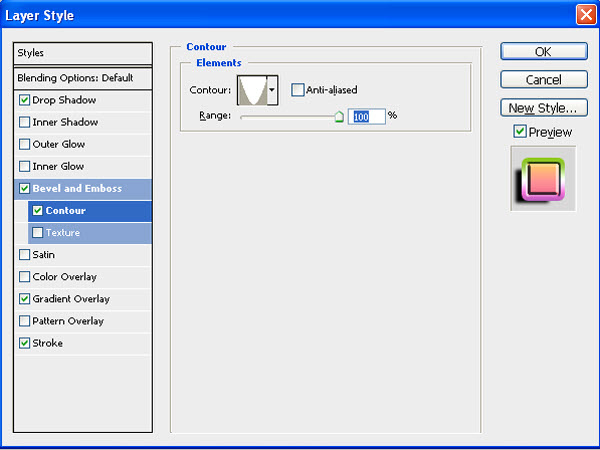
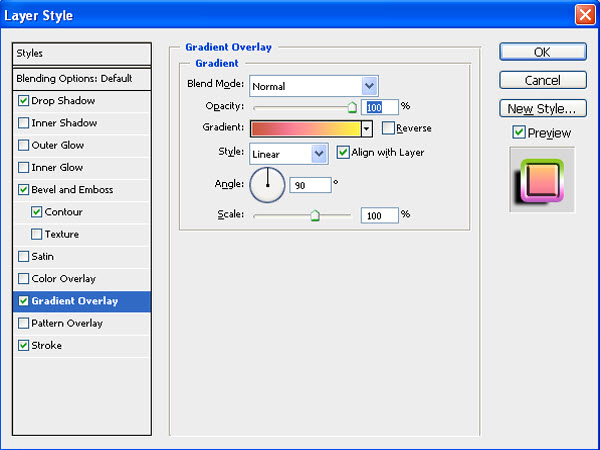
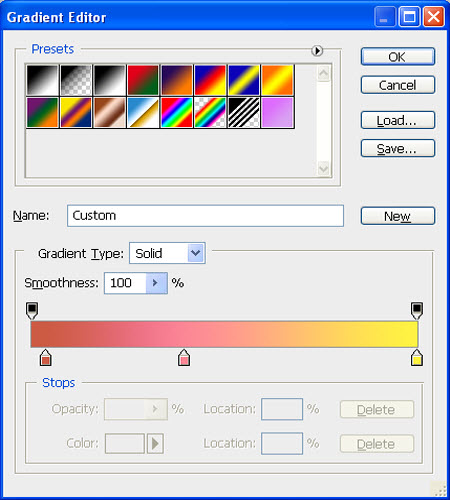
5. In a Gradient Overlay, I have used 3 Color Stops. In 1st Color Stop fill this value: cc5a44, in a 2nd fill fb8795 and in a 3rd fff441 fill this value. See following image for a reference:
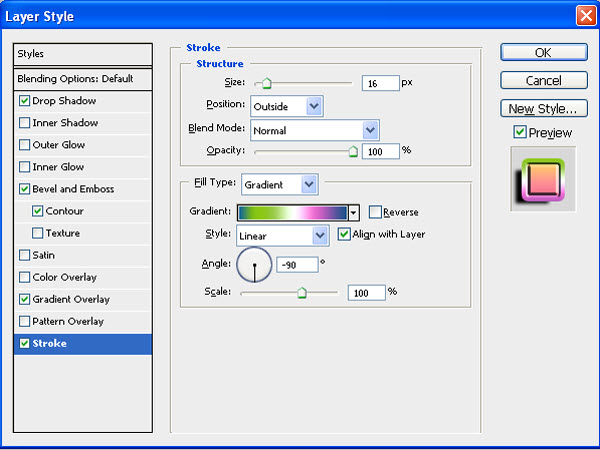
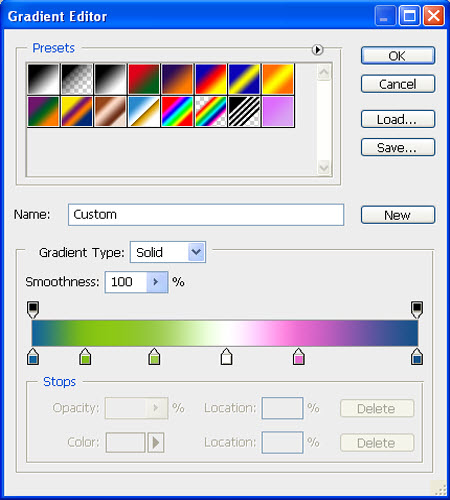
6. To apply beautiful and colorful stroke to a digit then in a Gradient make the use of 6 Color Stops. And fill these values as mentioned below:
1st Color Stop: 12659d
2nd Color Stop: 7fbf14
3rd Color Stop: 9bcb4a
4th Color Stop: ffffff
5th Color Stop: e96dd0
6th Color Stop: 145288
So, after applying all these effects to a digit 2012 then finally you will get an awesome output as shown in image:

Now to create a more shining / bright light tone around the 2012 then make the use of following technique:
7. First take a duplicate of your stylized 2012 layer by pressing Ctrl + j. This time turn off only the “Effects “of a duplicate layer and also turn off the main stylized 2012 layer then your image will look like this:

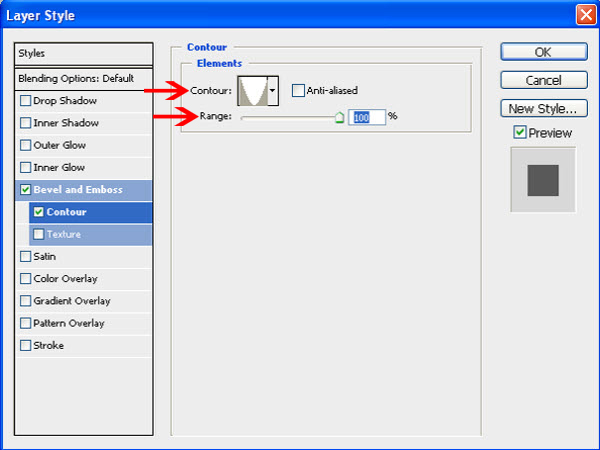
8. Now go to the Blending Options of a duplicate layer and in a Contour option belonging to the Bevel and Emboss apply setting as shown in image:
9. Then right click on Layer effect logo, for reference see in below image:
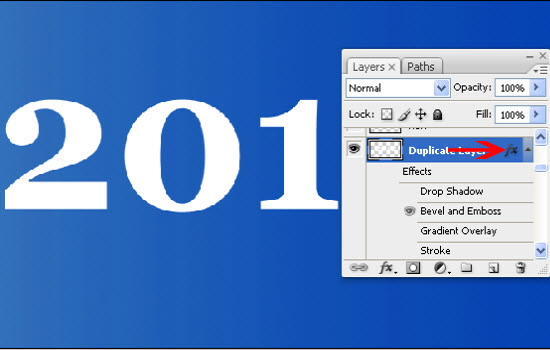
10. And then select “Create layer” options. After applying this setting, there will generate 3 different layers, 1st will be your same layer another one will be Emboss Shadows and then Emboss Highlights.
11. Now to see the magic around the 2012 digit just keep ON the layer Emboss highlights, turn off remaining two. And then make the 2 duplicates of an Emboss highlights layer to glow an image in more amounts then by pressing Ctrl + E merge that duplicate layers and then select Blending Mode to Vivid Light.
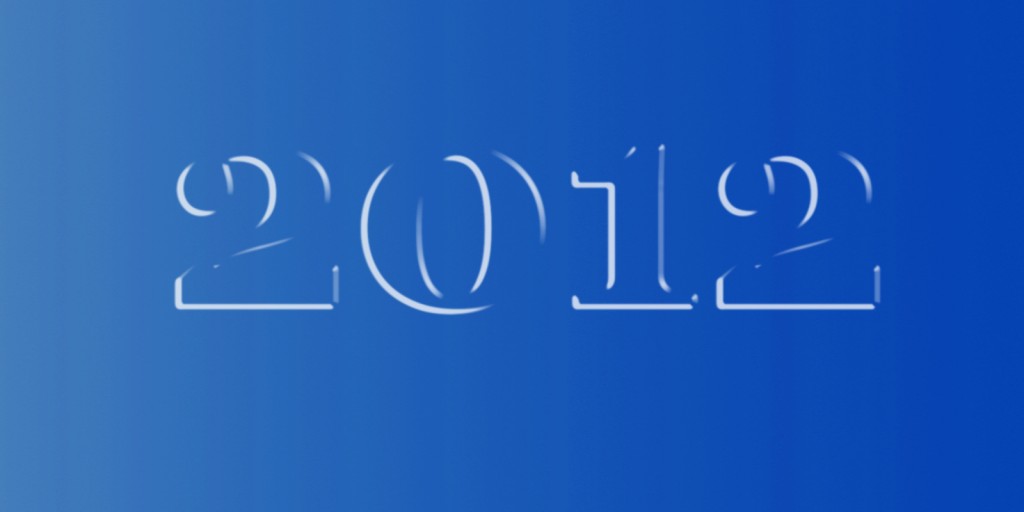
And turn on the main layer of 2012.
To get the proper result don’t move the position of any layers either it will be main stylized layer or duplicate layer of it or else Emboss highlights layer of the Duplicate layer.
So you will get final output of 2012 digit like as shown in following image:

New Year greeting Card: Border
Our focus point of this image is 2012 digit but if you see in the previous output then you will notice that our attention is diverting all over the image because there is no any depth in an image. So to concentrate only on 2012 digit and to create depth in an image follow this technique:
12. Draw a rectangle using Rectangle Marquee Tool near to the main border of a page and then by pressing Shift + Ctrl + I Inverse it after that fill black color into the selected region. For a reference check the following images:
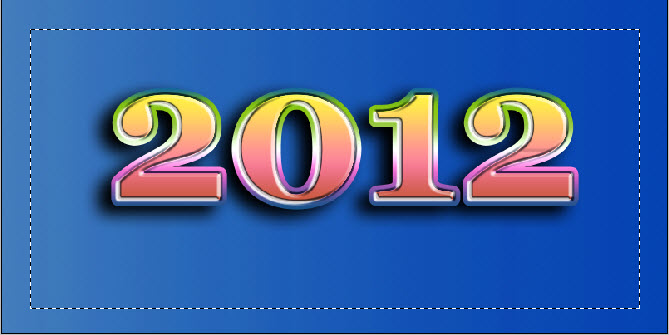
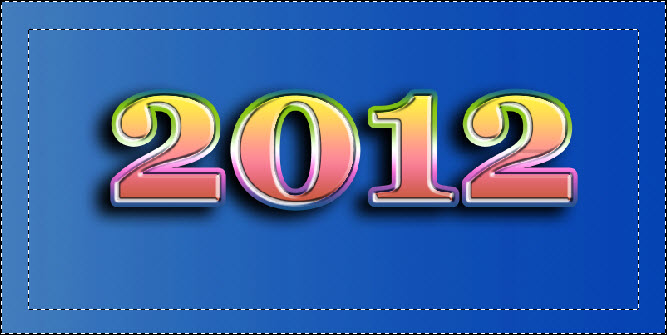
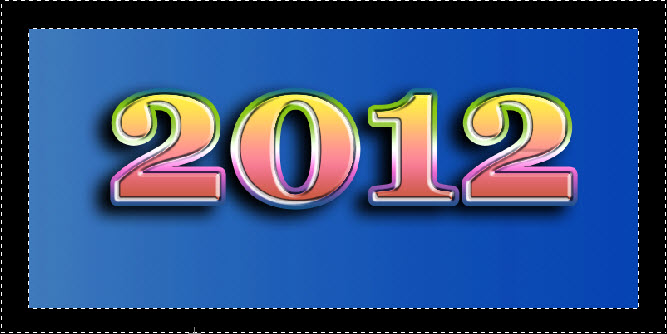
So, now you have got complete black colored border but we don’t want completely dark border and also we don’t want border to all sides of the rectangle.
13. So to make it blur, in Filter -> Blur -> choose Gaussian Blur and apply Radius 70 pixels like this:
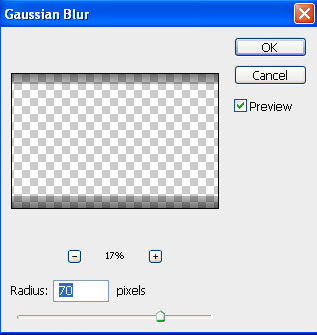
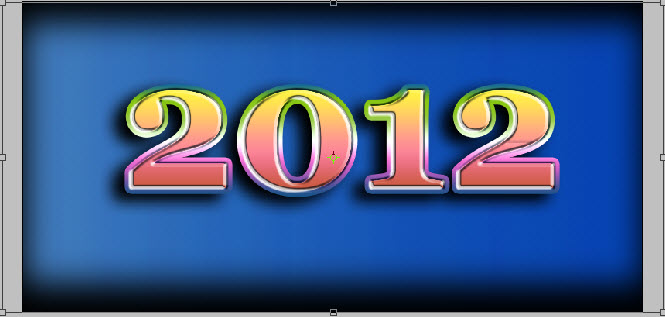
So you will get this output:

14. To just keep the borders only on two sides (top and bottom) then you have to transform a layer by pressing Ctrl + T and after that stretch the corners of the left and right side like this:
New Year greeting Card: Text
15. For Happy New Year text, I have used Bittersweet font, it’s looking pretty nice. Then I applied white color to it and to bringing glow, in Blending Option, choose only Outer Glow in that select Blend Mode: Screen and Opacity: 75.

New Year greeting Card: Colorful Strip
16. Make a rectangle by using Rectangle Marquee tool. In that selection, by using Gradient Tool apply Black-Grey-White tone. Like this:

17. Then duplicate the layer and by transforming it, right click in the selected region and choose Flip Horizontal. Then place duplicate layer here like as shown in an image.

18. And at last, merge both the layers and select Color Dodge Blending mode.
And then erase unwanted part by using Eraser tool; resize a strip properly to suit to an image. So finally you will get an output like this:

New Year greeting Card: Background
To make a dynamic background I have used following design.

19. Don’t just place it as it is otherwise it will divert the whole attention. So to blend it in image, choose Blending mode Overlay and keep low opacity to 50%.

New Year greeting Card: Glowing Star
20. To create a fantastic star, first make a basic star shape by using Polygon Lasso Tool as shown in an image. And then apply white color to it.

21. Now Duplicate the Layer by pressing Ctrl + J. Then Transform Duplicate Layer by pressing Ctrl + T and after that rotate it a bit to give exact shape of star like as shown in image.
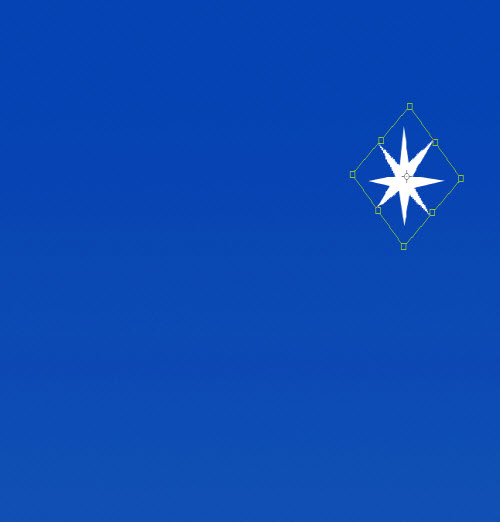
To give nice shape to a star then you have to stretch 4 corners of a star.
22. To do it, select Rectangle Marquee Tool and place it on the bottom corner of a star. And then Transform that selected bottom corner part and pull it down. So you will get an output like this.
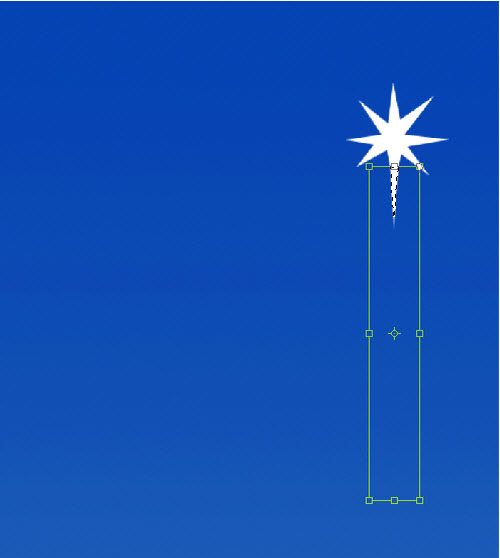
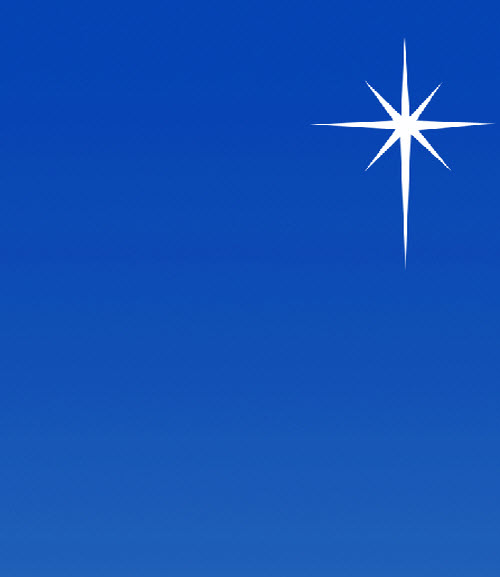
23. Follow the same process to remaining 3 corners. After getting proper star shape then press Ctrl + E to merge both the Star image layers.
So after giving proper shape and properly stretching, you will get final output of a star like as shown in the image below.
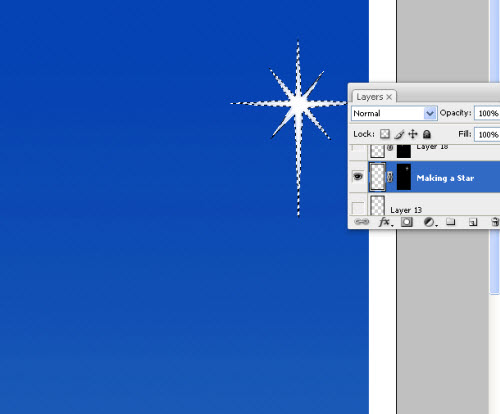
24. To remove Sharpness of a star and to add some smoothness, first press Ctrl + click to select the layer and apply Vector Mask to it.
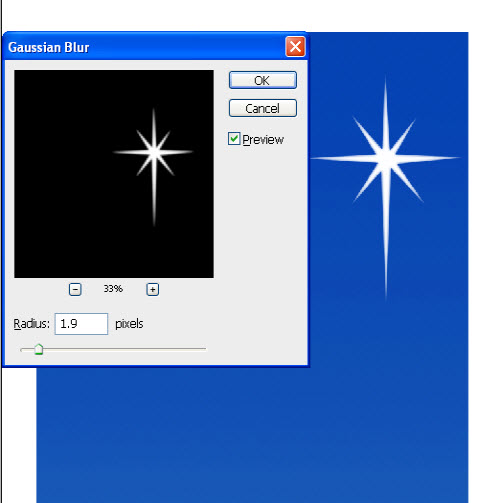
25. And then in Filter -> Blur -> select Gaussian Blur, apply it on a Star layer by keeping Radius 1.9 pixels to the Mask only not to the layer.
26. To give a glowing effect to the middle part of a star, on a New Layer, create a circle using Ellipse tool, apply white color to it. And then by using Gaussian Blur tool set its radius to 27 pixels.
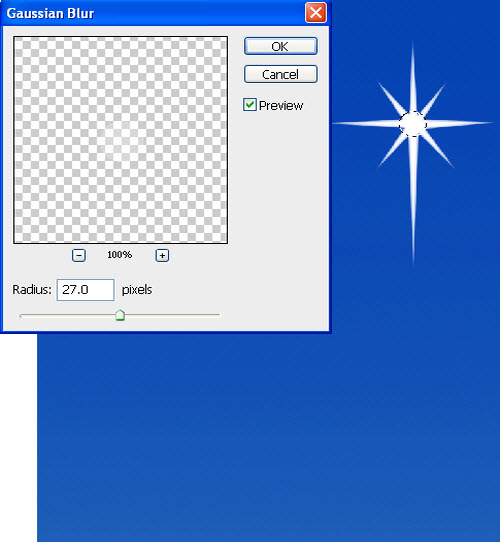
After that keep that layer of circle behind the Star layer. So then your final Glowing Star will look like this.

Finally, select a star image layer, make some duplicates of it and then spread it all over the page by appropriately resizing and by decreasing opacity of them. But spread it in limit, don’t overdo it otherwise it will remove the overall impact of output.

New Year greeting Card: Scattered Rays
To create scattered rays in the above region of a digit then you have to follow this smart technique:
27. First, duplicate the Layer of a 2012 digit. Then turn off all the effects of that duplicate layer and also turn off the Emboss Highlights layer.
28. Select the image by pressing Ctrl + Click and in Filter -> Noise -> select Add Noise by keeping amount 70%. Don’t forget to keep its setting as shown in image:
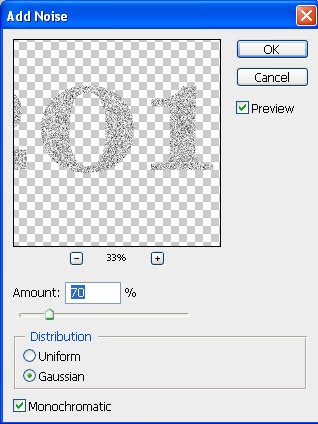
29. After that by using Rectangular Marquee Tool, select particular area where you have to show the scattering of rays. Purpose of using Rectangular Marquee Tool here is that it allows to scattering the image in a particular, assigned direction only. Refer this image:

30. Then in Filter -> Blur -> select Radial Blur by keeping Amount: 100 and Blur Mode: Zoom and adjust Blur Center to the bottom so that rays flow will automatically adjust to the upward direction, as shown in image.
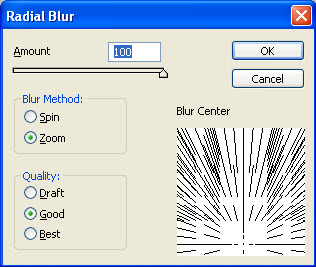

31. Repeat the same process 4 times. This time press only Ctrl + F (4 times) it will repeat the same process.
Not got satisfying output? Don’t worry. So to get desired output, again follow the Step No. (13) This time add Noise value to 95, (14) and (15) to get perfectly scattered rays.
32. After getting satisfying effect then to brighten rays in more amounts, in Filter -> Sharpen -> select Unsharp Mask. And add following settings to this tool:
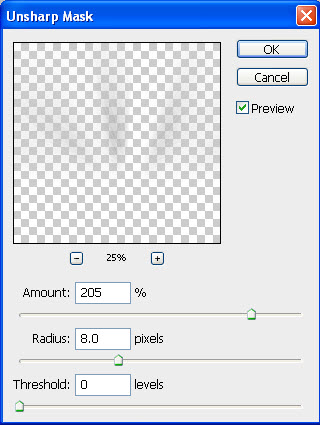
33. Then to matching background color, select Overlay blending mode and erase unwanted part of rays by using Eraser Tool. So your final output of rays will look like this:

Then turn on the main 2012 digit layer to see an output.

34. To get more scattered look of rays then you can follow this step. First Transform a rays layer after that right click over there, select Perspective and give appropriate direction to the rays layer to look more scattered.
To Make Glowing Circles:
35. Select brush tool and in Brush Palette use Number 21 brush which is in Blur mode not solid and reduce its Opacity to 80%. Then drop a tip of a brush on background by selecting White Color. Again reduce the size of a brush, choose Number 17 brush, reduce its opacity to 60% and drop a tip of a brush at the middle of a same circle. Again follow the same process using Number 13 brush and Opacity 40%.
Duplicate many layers of it and then spread it appropriately. And then choose Hard Light blending mode to brighten it by properly merging in a background color.

This is really so much little thing as per some of your thinking but I think you should include it in your work so by that it will give beautiful effects to your working image.
New Year greeting Card: Final Output

We have done it so impressively. Now do sufficient changes in the image by your creativity but don’t overdo it. Actually it is pretty sufficient but still tries it if you have any idea and have enough time for your New Year Greeting Card
And then take a print out of your New Year Greeting Card on the paper and then give it personally to your loving person. All the best and Happy New Year in advance…
Don’t have Photoshop?
The cheapest place we found to purchase Adobe Photoshop CS5 is Amazon. Click here to order it now.
KMahesh author of howtouse-photoshop.com. Get complete knowledge of Photoshop software and learn to bring beauty in an any image while working with Photoshop.
