Build a contact manager in Flex 3 with ZendAMF; Part Two – Coding the CRUD & Final Release
by 15 June, 2009 1:00 pm5
The complete result of this 2 part tutorial is a contact manager built in flex that uses ZendAMF to store data in mysql. In the this second part we will code all the application and backend functions using Flex 3 + ZendAMF + Php 5 + MySql. This part will use a general crud system (Create, Read, Update and Delete) that is similar to the most applications needs. You will be able to write you own application from scratch.
Requirements
Have read, and made the first part of this tutorial here
Adobe Flex Builder 3.x – You can download a free trial at flex homepage
A carefully read of this article here about Flex & zendAMF integration
Pre-Requesites
This time, you really need to have some more things in mind:
– A good php 5 and mysql knowledge , as you can imagine our Contact manager will use a little of both to work.
– Have a installed server with mysql and php 5.
– Have downloaded ZendAMF from here
– Need to feel comfortable working with Flex 3, Action Script 3 and Remote Object’s…
The rest? it’s easy! Lets get started!
Step 0 – Getting Started
Make sure you have the original source from part one of this tutorial, have the download of ZendAMF and some free time!
Step 1 – Create data in Mysql
The first thing to do is to create a database called cmanager into your mysql server and then just import/write the following instructions and execute them. (If you got phpmyadmin, just open the SQL window and write down it)
CREATE TABLE IF NOT EXISTS `contacts` (
  `id` int(11) NOT NULL auto_increment,
  `f_name` varchar(50) NOT NULL,
  `l_name` varchar(50) NOT NULL,
  `address` tinytext NOT NULL,
  `tel_1` varchar(20) NOT NULL,
  `tel_2` varchar(20) NOT NULL,
  `fax` varchar(20) NOT NULL,
  `skype` varchar(25) NOT NULL,
  `email` varchar(50) NOT NULL,
  `web` varchar(100) NOT NULL,
  `foto` varchar(250) NOT NULL,
  PRIMARY KEY  (`id`)
) ENGINE=MyISAM  DEFAULT CHARSET=latin1 AUTO_INCREMENT=1 ;

INSERT INTO `contacts` (`id`, `f_name`, `l_name`, `address`, `tel_1`, `tel_2`, `fax`, `skype`, `email`, `web`, `foto`) VALUES
(1, 'Mario', 'Santos', '6, rue LinkorffrL-5555 Luxembourg', '00 352 621 3855 55 4', '00 352 621 3855 55 4', '', 'msdevweb', 'admin@msdevstudio.com', 'http://www.msdevstudio.com', 'http://loadimage.org/thumbapi/uploads/thumbs/my_photo.jpg'),
(2, 'Paul', 'Land', '211, grand avenuerUS 225 Los Angels', '00 22 55 448 55', '00 48 55 444 22', '00 22 55 448 56', 'PaulLandOff', 'paul.land@gmail.com', 'www.pland.com', 'http://loadimage.org/thumbapi/uploads/thumbs/capturer2.jpg'),
(3, 'Richard', 'Lemon', 'Route gatewayr125, New Yorkr', '00 21 545 5475', '00 584 58 558 5', '00 21 545 5476', 'richard.lemon', 'richard.lemon@mail.com', 'www.rlemon.com', 'http://loadimage.org/thumbapi/uploads/thumbs/capturer.jpg');
Execute this, a table contacts will be created and will have 3 contacts, this is the sample data, don’t worry, you can delete it later.
In mysql, this is all you need! Lets go into php!
Step 2 – Put zendAMF in Place
This is one crucial step, go to your server docs folder (htdocs ou www) and create a folder cmanager, inside this follow the same things here on step 2, just copy the Zend folder into the cmanager folder.
Create two php files in this folder, one named index.php and other named cmanager.php, these are the files needed in Zend, you don’t need to do anything more.
Lets write some php code that i will explain some things relative to crud functions.
index.php file – download my version
<?php

  // error_reporting(E_ALL | E_STRICT);
  // ini_set("display_errors", "on");
  // .. optional

 require_once "Zend/Amf/Server.php";

 $server = new Zend_Amf_Server();

 $server->setProduction(false);

  //recommended
  $handle=$server->handle(); //needed to start the server
  echo $handle;

  //old way
  //echo($server->handle()); //needed to start the server

  ?>
Server is ready to rock!! This will be our gateway to flex!
Step 3 – Writing up Zend CRUD Class
Just need the php functions to work with our database, just write this on the cmanager.php file ( download my version )
<?php
define("DATABASE_SERVER", "localhost");
define("DATABASE_USERNAME", "SEU_USERNAME"); //put your username
define("DATABASE_PASSWORD", "SUA_PASSWORD"); //put your password
define("DATABASE_NAME", "cmanager");

class cmanager {
  //constructor, needed to make the mysql connection availiable in the class
  public function __construct() {
  $mysql = mysql_connect(DATABASE_SERVER, DATABASE_USERNAME, DATABASE_PASSWORD);
  mysql_select_db(DATABASE_NAME);
	}

  //here we put main class functions.

	//function to save and update a contact
  public function saveContact($data=NULL, $update=false, $id=NULL) {
  if($data==NULL) return "No data to insert/update";
  //we will use a function e_ to escape invalid chars and avoid some errors, see the function on bottom!
  if($update==false)
  {
  //lets insert
  $sql="INSERT INTO `contacts` VALUES (NULL, '".$this->e_($data->f_name)."', '".$this->e_($data->l_name)."','".$this->e_($data->address)."','".$this->e_($data->tel_1)."','".$this->e_($data->tel_2)."','".$this->e_($data->fax)."','".$this->e_($data->skype)."','".$this->e_($data->email)."','".$this->e_($data->web)."','".$this->e_($data->foto)."')";
  if(mysql_query($sql)) return true;
  else return "Contact insert error! Details: ".mysql_error();
  }
  else if($update==true && $id!=NULL && $id!=-1)
  {
  //lets update
  $sql_u="UPDATE `contacts` SET `f_name`='".$this->e_($data->f_name)."',`l_name`='".$this->e_($data->l_name)."', `address`='".$this->e_($data->address)."', `tel_1`='".$this->e_($data->tel_1)."', `tel_2`='".$this->e_($data->tel_2)."', `fax`='".$this->e_($data->fax)."',`skype`='".$this->e_($data->skype)."',`email`='".$this->e_($data->email)."',`web`='".$this->e_($data->web)."',`foto`='".$this->e_($data->foto)."' WHERE `id`='".$id."' LIMIT 1";
  if(mysql_query($sql_u)) return true;
  else return "Contact update error! Details: ".mysql_error();
  }
  else return "Invalid instruction or ID for update!";
  }

  //delete function
  public function deleteContact($id=NULL, $confirmationKey=NULL) {
  if($id==NULL) return "Invalid ID for delete!!";
  if($confirmationKey!="keyDelete05f") return "Invalid confirmation Key!!"; //we use a simple key for security, remember this
  $id=mysql_real_escape_string($id); //just in case!

  $sql_d="DELETE FROM `contacts` WHERE `id`='".$id."' LIMIT 1";
  if(mysql_query($sql_d)) return true;
  else return "Cannot delete contact! Details: ".mysql_error();
  }

  //get all contacts
  public function getContacts($id=NULL) {
  $dados=array();
  if($id!=NULL && is_int($id))
   {
  	$id=mysql_real_escape_string($id);

   //list only isolated contact info
   $sql_li="SELECT * FROM `contacts` WHERE `id`='".$id."' LIMIT 1";
   if($res=mysql_query($sql_li)) {
   $dados[0]=mysql_fetch_array($res);
   }
   else return "Cannot get contact info! Details: ".mysql_error();
  }
  else
  { //list all contacts
  $sql_l="SELECT * FROM `contacts`";
  if($res2=mysql_query($sql_l)) {
  	$x=0;
  	while($data=mysql_fetch_array($res2))
		{
  		$dados[$x]=$data;
  		$x++;
  		}
  }
  else return "Cannot get contact info! Details: ".mysql_error();
  }
  return $dados;
  }

  //escape the data to avoid some errors and hacking attempts
  public function e_($str=NULL) {
  	if($str==NULL) return NULL;
  	else return mysql_real_escape_string($str);
	}

}
Well, is done! Yes, of course i could make some things better, but this is up to you!
Now, just edit the index.php file an write this:
require_once "cmanager.php";
after: require_once “Zend/Amf/Server.php”; and this:
$server->setClass("cmanager");
after: $server = new Zend_Amf_Server(); that will result in a index.php file like this
<?php

  // error_reporting(E_ALL | E_STRICT);
  // ini_set("display_errors", "on");
  // .. optional

  require_once "Zend/Amf/Server.php";
  require_once "cmanager.php";

  $server = new Zend_Amf_Server();
  $server->setClass("cmanager");

  $server->setProduction(false);

  //recommended
  $handle=$server->handle(); //needed to start the server
  echo $handle;

  //old way
  //echo($server->handle()); //needed to start the server

?>
We got our CRUD class loaded and ready to work into the zendAMF server!
Step 4 – Configuring the services in Flex
This is the same step as the step 3 here; create a services-config.xml in the src folder of your flex project (grab the source of part one here) and write this down:
<?xml version="1.0" encoding="UTF-8"?>
<services-config>
<services>
<service id="amfphp-flashremoting-service" class="flex.messaging.services.RemotingService" messageTypes="flex.messaging.messages.RemotingMessage">
<destination id="zend">
<channels>
<channel ref="my-zend"/>
</channels>
<properties>
<source>*</source>
</properties>
</destination>
</service>
</services>
<channels>
<channel-definition id="my-zend" class="mx.messaging.channels.AMFChannel">
<endpoint uri="http://msdevstudio.com/mywork/cmanager/" class="flex.messaging.endpoints.AMFEndpoint"/>
</channel-definition>
</channels>
</services-config>
Well, just change the endpoint uri to your localhost, this should work: http://localhost/cmanager/ (if you follow all the instructions) and save it.
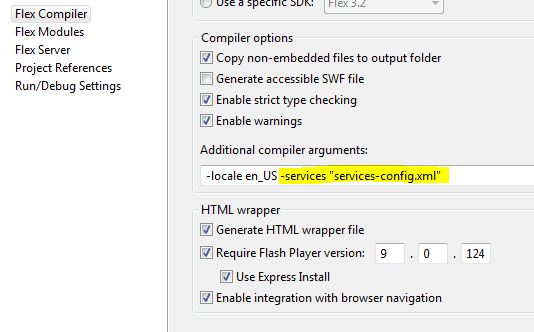
Go now to your Flex Builder project and open Project Properties (menu Project->Properties->Flex Compiler) and write -services “services-config.xml” in the additional compiler arguments. Like this:
Push the ok button!
Now our Flex Project is ready to work with ZendAMF.
Step 5 – Write down a Remote Object
Now we will need to write down a remote object to connect to our ZendAMF Server, write this code down on the ContactManager.mxml file, at bottom between: </mx:Canvas> and </mx:Application>:
<mx:RemoteObject id="crud" destination="zend" showBusyCursor="true" source="cmanager">
<mx:method name="saveContact" result="onSave(event)" fault="onError(event)">
<mx:arguments>
<data>
					{null}
</data>
<update>
					{false}
</update>
<id>
					{null}
</id>
</mx:arguments>
</mx:method>
<mx:method name="deleteContact" result="onDelete(event)" fault="onError(event)">
<mx:arguments>
<id>
					{null}
</id>
<confirmationKey>
					{"keyDelete05f"}
</confirmationKey>
</mx:arguments>
</mx:method>
<mx:method name="getContacts" result="onGetContacts(event)" fault="onError(event)">
<mx:arguments>
<id>
					{null}
</id>
</mx:arguments>
</mx:method>
</mx:RemoteObject>
Confused? Don’t be! this will all work fine! We have the remoteObject crud with “zend” as destination and the “cmanager” as source class.
Then, for each php function we have one method with a result function to handle the zend/php reply and one fault to handle communication errors. Inside each function you can see the function arguments, in php for example the saveContact function receives (data, update, id) and we must put them as arguments in the remote object by the same order…
The confirmationKey argument has the same value that php function, this is important to avoid some security issues. Is not mandatory, but i use it!
Step 6 – Create a item renderer for datagrid
We will make a small item renderer for the datagrid column based on a HBox where we will put an image and a a label. (these will show the contact thumb and the contact name).
Go to menu File->New->MXML Component and make it equal as this:
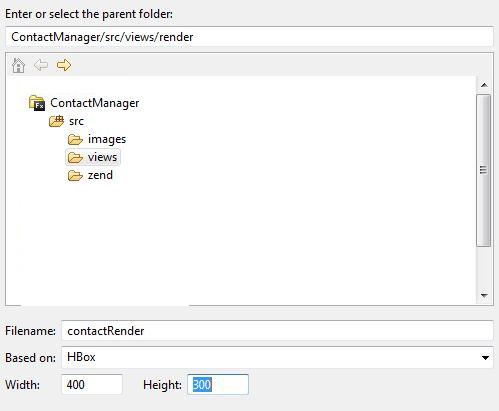
Your project does not have a folder called views. On top write after ContactManager/src write: /views/render as shown.
On file name write contactRender, based on Hbox and the dimensions leave them by default.
Your editor will now open, clean all code and paste this one:
<?xml version="1.0" encoding="utf-8"?>
<mx:HBox xmlns:mx="http://www.adobe.com/2006/mxml" width="100%" height="25" horizontalGap="2" borderThickness="1" borderColor="#202020" borderStyle="solid">
<mx:Image height="25" width="25" scaleContent="true" includeInLayout="true" maintainAspectRatio="true" source="{data.foto}"/>
<mx:Label width="100%" height="100%" fontSize="14" color="#FFFFFF" textAlign="left" text="{data.f_name+' '+data.l_name}"/>
</mx:HBox>
Change to Design View if you want to see what i mean! This will replace each datagrid row and show each contact first name, last name and image.
We need also to make a component to show the contact details, that will be placed when the extended area is shown, so lets do it!
Step 7 – Create a component to show contact details.
As previous, go to menu File->New->MXML Component, and this time do the following:
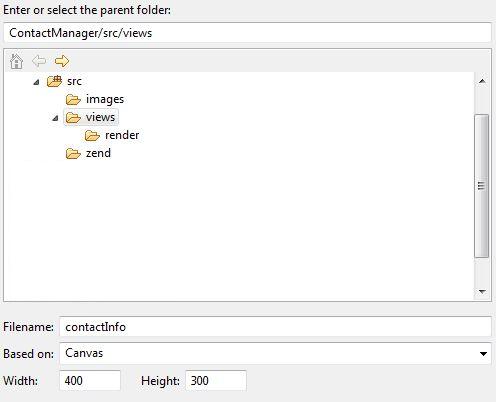
The editor will open, just clean the code and write this down:
<?xml version="1.0" encoding="utf-8"?>
<mx:Canvas xmlns:mx="http://www.adobe.com/2006/mxml" width="315" height="334">
<mx:Script>
<![CDATA[
			[Bindable]
			public var _Editable:Boolean=false; //used to enable/disable field edition (View/Edit)

			public var _ID:int=-1; //id of loaded contact, will change on each contact load
			[Bindable]
			public var _FieldsBorder:String="none"; //the fields border, they don't have border and they are transparent, we set this to "solid" to know that we are in edition mode.

			//used to clean all the fields contents and id.
			public function clearFields():void {
			contactImage.source=undefined;
			_ID=-1;
			title_1.text="";
			title_2.text="";
			f_name.text="";
			l_name.text="";
			address.text="";
			tel_1.text="";
			tel_2.text="";
			fax.text="";
			skype.text="";
			email.text="";
			web.text="";
			}

		]]>
</mx:Script>
<mx:Image x="12" y="14" id="contactImage" width="80" height="80"/>
<mx:Label x="10" y="96" text="First Name :" color="#AED1D3"/>
<mx:Label x="10" y="121" text="Last Name :" color="#AED1D3"/>
<mx:Label x="10" y="146" text="Telephone 1 :" color="#AED1D3"/>
<mx:Label x="10" y="172" text="Telephone 2 :" color="#AED1D3"/>
<mx:Label x="10" y="195" text="Fax :" color="#AED1D3"/>
<mx:Label x="10" y="244" text="Email :" color="#AED1D3"/>
<mx:Label x="10" y="219" text="Skype :" color="#AED1D3"/>
<mx:Label x="9" y="268" text="Web :" color="#AED1D3"/>
<mx:Label x="9" y="290" text="Address :" color="#AED1D3"/>
<mx:Text x="99" y="15" width="207" height="40" fontSize="18" textAlign="center" color="#FFFFFF" id="title_1"/>
<mx:Text x="100" y="60" width="205" height="34" fontSize="10" textAlign="center" color="#FFFFFF" id="title_2"/>
<mx:TextInput x="100" y="96" width="206" editable="{_Editable}" backgroundAlpha="0" color="#FFFFFF" disabledColor="#2B2B2B" borderThickness="1" borderStyle="{_FieldsBorder}" id="f_name"/>
<mx:TextInput x="100" y="120" width="206" editable="{_Editable}" backgroundAlpha="0" color="#FFFFFF" disabledColor="#2B2B2B" borderThickness="1" borderStyle="{_FieldsBorder}" id="l_name"/>
<mx:TextInput x="100" y="145" width="206" editable="{_Editable}" backgroundAlpha="0" color="#FFFFFF" disabledColor="#2B2B2B" borderThickness="1" borderStyle="{_FieldsBorder}" id="tel_1"/>
<mx:TextInput x="100" y="170" width="206" editable="{_Editable}" backgroundAlpha="0" color="#FFFFFF" disabledColor="#2B2B2B" borderThickness="1" borderStyle="{_FieldsBorder}" id="tel_2"/>
<mx:TextInput x="100" y="195" width="206" editable="{_Editable}" backgroundAlpha="0" color="#FFFFFF" disabledColor="#2B2B2B" borderThickness="1" borderStyle="{_FieldsBorder}" id="fax"/>
<mx:TextInput x="100" y="219" width="206" editable="{_Editable}" backgroundAlpha="0" color="#FFFFFF" disabledColor="#2B2B2B" borderThickness="1" borderStyle="{_FieldsBorder}" id="skype"/>
<mx:TextInput x="100" y="244" width="206" editable="{_Editable}" backgroundAlpha="0" color="#FFFFFF" disabledColor="#2B2B2B" borderThickness="1" borderStyle="{_FieldsBorder}" id="email"/>
<mx:TextInput x="100" y="268" width="206" editable="{_Editable}" backgroundAlpha="0" color="#FFFFFF" disabledColor="#2B2B2B" borderThickness="1" borderStyle="{_FieldsBorder}" id="web"/>
<mx:TextArea x="100" y="292" height="40" width="206" backgroundAlpha="0" borderThickness="1" borderStyle="{_FieldsBorder}" color="#FFFFFF" id="address" editable="{_Editable}" verticalScrollPolicy="off"/>
</mx:Canvas>
In here you can see the fields, image and all the code we need. This is now ready to load a client info. Save it.
Step 8 – Setting up the MXML components and Styles
I’ve made some style declarations to make the this more… blue! Write this code after <mx:Application> and before the <mx:Script>:
<mx:Style>
	Button {
   cornerRadius: 0;
   highlightAlphas: 0.46, 0;
   fillAlphas: 1, 1, 1, 1;
   fillColors: #3399ff, #6699ff, #3399ff, #33ccff;
   color: #ffffff;
   textRollOverColor: #ffffff;
   textSelectedColor: #ffffff;
   borderColor: #000000;
   themeColor: #0000cc;
}
Alert {
	backgroundAlpha: 0.87;
	borderAlpha: 0.87;
	borderColor: #6699ff;
	backgroundColor: #6699ff;
}
DataGrid {
   alternatingItemColors: #3399ff, #3399cc;
   verticalGridLines: false;
   verticalGridLineColor: #cccccc;
   useRollOver: true;
   rollOverColor: #0066cc;
   textRollOverColor: #ffffff;
   borderThickness: 0;
   selectionColor: #003366;
   color: #ffffff;
   textSelectedColor: #00ccff;
}
</mx:Style>
This will make things more beauty, you can use your own styles…
Our previous (part 1) code needs some improvements and some changes,
– In the <mx:Application> write this:
<mx:Application xmlns:mx="http://www.adobe.com/2006/mxml" layout="absolute" creationComplete="getContacts()" backgroundGradientAlphas="[1.0, 1.0]" backgroundGradientColors="[#4CABC6, #4CABC6]" xmlns:ns1="views.*">
Here we call a function getContacts() when application is ready (creationComplete event), and we enumerate the ns1 (xmlns:ns1=”views.*”) prefix to load our contactLoader component.
– Delete the contactsDP, put it like this (it will be populated by zendAMF) :
private var contactsDP:ArrayCollection = new ArrayCollection();
Write these imports and variables just before the private var DETAILS_OPEN…:
	import views.render.contactRender; //our datagrid renderer
	import mx.events.CloseEvent; //used to catch Alert.show() actions
	import mx.controls.Alert; //alert
	import mx.rpc.events.ResultEvent; //events from remoteObject crud
	import mx.rpc.events.FaultEvent;

	private var EDIT_MODE:Boolean=false; //to save Edit status
	private var brw:FileReference; //file reference to open a foto to the contact
	private var FILTER_L:String=null; //a var to save a letter to the alphabetic filter
Update the existing filter function with this one:
private function filter(char:String="A"):void {
	FILTER_L=char; //save actual letter
	contactsDP.filterFunction=filterByAlpha; //filter function
	contactsDP.refresh() //refresh DP
}
And write this 3 functions for search (they are commented, so i will not explain them):
private function filterByAlpha(item:Object):Boolean {
	//filter by letters: A, B, C, D, ..
	var isM:Boolean=false; //not found, saves the result of comparation for each item in DP.
	//check each entry in the dataProvider for the letter in f_name and l_name
	//put them all in uppercase so is easy to find.
	if(String(item.f_name).substr(0,1).toUpperCase()==FILTER_L.toUpperCase()) isM=true; //found
	else if(String(item.l_name).substr(0,1).toUpperCase()==FILTER_L.toUpperCase()) isM=true; //found
	return isM;

}
private function doSearch():void { //used every time the search field changes
	contactsDP.filterFunction=filterInput; //define filter function
	contactsDP.refresh();
}
private function filterInput(item:Object):Boolean
   {
    //filter by search field text
    var isMatch:Boolean = false
    if(item.f_name.toLowerCase().search(search.text.toLowerCase()) != -1) isMatch = true;
    else if(item.l_name.toLowerCase().search(search.text.toLowerCase()) != -1) isMatch = true;
    if(item.id)  if(item.id.toLowerCase().search(search.text.toLowerCase()) != -1) isMatch = true;
    return isMatch;
 }
Now we continue, update also your showDetails function with this one:
private function showDetails():void {
			if(DETAILS_OPEN==false) {
				if(DGContacts.selectedIndex>-1) { //we only show the details if a contact is selected
				toggleDetails(true);
				loadInfo(DGContacts.selectedItem);
				}
				else Alert.show("Select a contact first!");
			}
			else loadInfo(DGContacts.selectedItem);

			//because we will add some edit buttons, here we need to hide them, we will write this function later.
			showEditButtons(false);
		}
Now in the MXML code we will modify and add some buttons and components.
Where you have the :
<mx:Image x="47" y="33" source="@Embed(source='images/back_extended.png')" id="extended_back" showEffect="WipeRight" hideEffect="WipeLeft" visible="false"/>
Delete and put this:
<mx:Canvas x="47" y="33" id="extended_back" showEffect="WipeRight" hideEffect="WipeLeft" visible="false">
<mx:Image x="0" y="0" source="@Embed(source='images/back_extended.png')"/>
<ns1:contactInfo x="220" y="37" id="contactInfoLoader" />
<mx:Button x="220" y="375" label="Open foto" width="85" click="browseImage()" id="btnFoto" visible="false" useHandCursor="true" buttonMode="true" />
<mx:Button x="307" y="375" label="Save Changes" id="btnSave" visible="false" click="saveContact()" useHandCursor="true" buttonMode="true"/>
<mx:Button x="414" y="375" label="Delete" width="90" id="btnDelete" visible="false" click="deleteContact()" useHandCursor="true" buttonMode="true" />
</mx:Canvas>
We have replaced the extended image with a canvas, inside it we put the extended image (to be used as background), we put the contactInfo component we have created before with id contactInfoLoader, and finally the button to edit the contact loaded, for now they are invisible and will be only visible when the user push the manage button.
Now go down a little and update the buttons view, manage and add with these ones:
<mx:Button label="VIEW" fontSize="8"  fontWeight="bold" useHandCursor="true" buttonMode="true" color="#FFFFFF" click="showDetails()"/>
<mx:Button label="ADD" fontSize="8"  fontWeight="bold" useHandCursor="true" buttonMode="true" color="#FFFFFF" click="openForNew()"/>
<mx:Button label="MANAGE" fontSize="8" fontWeight="bold" useHandCursor="true" buttonMode="true" color="#FFFFFF" click="showEditButtons(true)"/>
All these buttons will call some function, function that will be written next.
Update the datagrid with this one:
<mx:DataGrid x="57" y="114" id="DGContacts" borderThickness="0" width="194" height="315" backgroundAlpha="0" showHeaders="false" dataProvider="{contactsDP}" doubleClickEnabled="true" doubleClick="showDetails()" >
<mx:columns>
<mx:DataGridColumn headerText="" dataField="f_name" itemRenderer="views.render.contactRender" />
</mx:columns>
</mx:DataGrid>
An finally update your close details icon:
<mx:Image x="562" y="405" source="@Embed(source='images/close_details.png')" buttonMode="true" useHandCursor="true" toolTip="Close Contact Details / Edition" id="extended_close_details" showEffect="Fade" hideEffect="Fade" click="cancel()" visible="false"/>
We have finished the updates, has you can see we have many functions to write on the next step, explaining them step by step will simply not be easy, so I’ve made some comments on the ones a little more difficult in my point of view.
Step 9 – Writting all code to handle data and actions
On the loadInfo function, write this:
private function loadInfo(item:Object):void {
			//function to load content into our cerated component
		contactInfoLoader.clearFields();
		contactInfoLoader._Editable=false;
		contactInfoLoader.contactImage.load(item.foto);
		contactInfoLoader.title_1.text=item.f_name+" "+item.l_name;
		contactInfoLoader.title_2.text=item.tel_1;
		contactInfoLoader.f_name.text=item.f_name;
		contactInfoLoader.l_name.text=item.l_name;
		contactInfoLoader.address.text=item.address;
		contactInfoLoader.tel_1.text=item.tel_1;
		contactInfoLoader.tel_2.text=item.tel_2;
		contactInfoLoader.fax.text=item.fax;
		contactInfoLoader.skype.text=item.skype;
		contactInfoLoader.email.text=item.email;
		contactInfoLoader.web.text=item.web;
		contactInfoLoader._ID=item.id;

}
Next to the last AS3 code, and before the </mx:Script> tag, write this:
private function onSave(evt:ResultEvent):void {
		//handle contact save ok/error
		if(evt.result==true){
			Alert.show("Contact Saved/Updated");
			showEditButtons(false); //hide edit buttons
			crud.getContacts(); //update contacts
			EDIT_MODE=false; //disabe edit mode
			if(this.DETAILS_OPEN==true) toggleDetails(false); //if details panel is open, close it
		}
		else Alert.show(String(evt.result));	//upd, error ocurrend
		contactInfoLoader._FieldsBorder="none"; // hide input Fileds borders
		}

		private function onError(evt:FaultEvent):void {
		//Remote Object error handling
		Alert.show("Save error! "+evt.message);
		}

		private function onDelete(evt:ResultEvent):void {
			//on delete handler
			if(evt.result==true) { //if contact is deleted
				contactInfoLoader.clearFields(); //clear all fields
				Alert.show("Contact Deleted");
				crud.getContacts(); //get contact list again
				toggleDetails(false) //hide details panel
			}
			else Alert.show(String(evt.result)); //ups, error deleting!
		}

		private function onGetContacts(evt:ResultEvent):void {
			//get contacts handler, id sucess, the contacts came as array,
			//if is not an array it means an error
			if(evt.result is Array) {
				contactsDP=new ArrayCollection(evt.result as Array); //build the DataProvider of datagrid
			}
			else Alert.show(evt.result.toString())  //ups, not an array? is an error
		}

		private function getContacts(id:int=-1):void {

			//if acessing another domain:
			//Security.loadPolicyFile("http://msdevstudio.com/crossdomain.xml");
			//Security.allowDomain("http://msdevstudio.com");

			//lets call the remote object getContacts function to retrieve contacts
			if(id!=-1) crud.getContacts.arguments.id=id; //is an isolated contact (for this example is not needed, but the trick is this)
			else crud.getContacts.arguments.id=null; //not isolated, get them all
			crud.getContacts(); //load function
		}

		private function deleteContact(id:int=-1):void {
			//call to delete contatcInfoLoader loaded contact, by _ID
			if(this.DETAILS_OPEN==true && contactInfoLoader._ID!=-1) {
			Alert.show("Delete contact??","",Alert.YES+Alert.NO,null,onCloseConfirm); //confirm delete
			}
			else Alert.show("No contact selected!");
		}

		private function onCloseConfirm(evt:CloseEvent):void {
			if(evt.detail==Alert.YES) {
				//delete is confirmed, send order to zendAMF/php
				crud.deleteContact.arguments.id=DGContacts.selectedItem.id; //define the id (selected in datagrid)
				crud.deleteContact(); //deleet it
			}
		}

		private function saveContact():void {
			//used to save a contact
			var contact:Object = new Object(); //create an object to send to backend with all the contact infos
			contact.f_name=contactInfoLoader.f_name.text;
			contact.l_name=contactInfoLoader.l_name.text;
			contact.address=contactInfoLoader.address.text;
			contact.tel_1=contactInfoLoader.tel_1.text;
			contact.tel_2=contactInfoLoader.tel_2.text;
			contact.fax=contactInfoLoader.fax.text;
			contact.skype=contactInfoLoader.skype.text;
			contact.email=contactInfoLoader.email.text;
			contact.web=contactInfoLoader.web.text;
			contact.foto=contactInfoLoader.contactImage.source.toString(); //image path

		    crud.saveContact.arguments.data=contact; //set the data argument

		    if(EDIT_MODE==true) { //in case of edition
		    	crud.saveContact.arguments.update=true; //set update =true
		   		crud.saveContact.arguments.id=contactInfoLoader._ID; // set the update contact ID
		    }
		    else {
		    	crud.saveContact.arguments.update=false;
		    	crud.saveContact.arguments.id=-1;
		    }
				crud.saveContact(); //call save

		}

		private function browseImage():void {
		//used to load an image and then upload
		 var flr:FileFilter = new FileFilter("Images", "*.jpeg;*.jpg;*.png");
		 brw=new FileReference();

		 brw.addEventListener(Event.SELECT, onSelect);
		 brw.browse([flr]);

		}

		private function onSelect(evt:Event):void {
			//our photo is now selected

			//Normaly, you need to code a Upload script to save your files on the server, you can find
			//some over the internet like the one here:
			//http://weblog.cahlan.com/2006/09/uploading-files-with-flex-and-php.html Grab the souce php file
			//and just make some minor changes, it will work similar.

			//we will use a beta api coded by me to loadimage.org
			//this api is quite simple, it receives the image by upload, create and host a thumb and return
			//the thumb path with the size you have specified. The vars:

			//userkey="uploaderP07" //need to remain as is!!! (api key)
			//thumb_w= //width in px
			//thumb_h= //height in px

			//Do not use this apiKey to production issues, the uploaded images will be deleted after 30 days
			//In a near future you will be able do request one key at loadimage.org, then you can use it
			//for free.

			//Ih the Flex 4 /SDK 4 / Flash Player 10 will be possible to create the thumbnail in flex and save it anywhere.

			//lets load a policy file for some cross-domain data transfer issues:
			Security.loadPolicyFile("http://loadimage.org/crossdomain.xml");
			Security.allowDomain("http://loadimage.org");

			var req:URLRequest =new URLRequest("http://loadimage.org/thumbapi/uploadHandler.php");
			var url_vars:URLVariables = new URLVariables();
			url_vars.userkey="uploaderP07"; //should remain as is or it will not work!!
			url_vars.thumb_w="100"; //can change the width here
			url_vars.thumb_h="100"; //can change the height here
			req.data=url_vars;
			req.method=URLRequestMethod.POST;
			brw.addEventListener(DataEvent.UPLOAD_COMPLETE_DATA, onUploadDone);
			brw.upload(req);
		}

		private function onUploadDone(evt:DataEvent):void {
			//the upload api will return a path to the image, or an error!!
			if(String(evt.data.toString()).search("http://")>-1) {
			contactInfoLoader.contactImage.load(evt.data.toString()); //load the image
			//extended_back.visible=true;
			//toggleDetails(true);
			}
			else Alert.show(evt.data.toString()); //error

		}

		//show/hide the edit buttons
		private function showEditButtons(opt:Boolean=false):void {
			if(opt==false) {
				EDIT_MODE=false;
				btnFoto.visible=opt;
				btnSave.visible=opt;
				btnDelete.visible=opt;
				contactInfoLoader._Editable=false;
				contactInfoLoader._FieldsBorder="none";
				return void;
			}
			if(DGContacts.selectedIndex>-1) {
			if(DETAILS_OPEN!=true) showDetails();
			EDIT_MODE=true;
			btnFoto.visible=opt;
			btnSave.visible=opt;
			btnDelete.visible=opt;
			contactInfoLoader._Editable=true;
			contactInfoLoader._FieldsBorder="solid";
			}
			else Alert.show("Select a contact first!");
		}

		//open the details component for a new contact creation
		private function openForNew():void {
			if(DETAILS_OPEN==true) {
				EDIT_MODE=false;
				contactInfoLoader.clearFields();
				contactInfoLoader._Editable=true;
				contactInfoLoader._FieldsBorder="solid";
				btnFoto.visible=true;
				btnSave.visible=true;
				btnDelete.visible=false;
			}
			else {
				toggleDetails(true);
				EDIT_MODE=false;
				contactInfoLoader.clearFields();
				contactInfoLoader._Editable=true;
				contactInfoLoader._FieldsBorder="solid";
				btnFoto.visible=true;
				btnSave.visible=true;
				btnDelete.visible=false;
			}

		}

		//cancel edition/insertion
		private function cancel():void {

			EDIT_MODE=false;
			toggleDetails(false);
			contactInfoLoader.clearFields();
			contactInfoLoader._Editable=false;
			contactInfoLoader._FieldsBorder="none";
			btnFoto.visible=false;
			btnSave.visible=false;
			btnDelete.visible=false;

		}
This is all the code needed to run the application. In the middle you will find all code explanation and also a beta service shown for the first time in public, just for you! It’s a thumb API used to store thumbnails into the image hosting system at www.loadimage.org. Do not use it for production applications! the thumbs have a time limit.
So, that’s all… just check everything before run, and then push the button “Run Contact Manager”!
Grab the “ready to use” project here (change you localhost settings in the services-config.xml) and import it in Flex Builder. We hope you like this tutorial, maybe it’s a little extensive, but with this you will be able to write your own application easily. You can see an online full working version here.


