Setup Alternativa3D Development Environment
by 13 May, 2009 12:30 pm5
After our Alternativa 3D tutorials series, still some to know about how to setup Flex Builder correctly in order to start deploying their own Alternativa3D Flash Applications. Therefore we created this tutorial to guide and help you through the steps of setting up an Alternativa3D development environment.
After completion of this tutorial, be sure to have a look to the Alternativa 3D tutorials series, stepping you in some of the most important features of this powerful Flash 3D engine.
Requirements
Step 1
Download and install a a free 30 day trial copy of Adobe’s Flex builder from here. Make sure you get at least version 3.02, because earlier versions have issues with the GUI builder and the Flex 3 SDK.
Step 2
Download the SWC Alternativa SDK from here. You don’t get to see the source, but it is otherwise fully functional. You’ll need to sign up for a free account in order to download Alternativa.
Step 3
Install the debug (or content debugger) version of the Flash Player 10 player from here. The standard plugin (which you probably already have installed) does not allow you to step through your code while debugging a Flash/Flex application. I personally set my PC up by installing the debug Flash Player for Internet Explorer, while using the standard Flash Player for Firefox, which I used as my primary browser. This way I can debug my code in IE, and use Firefox with the standard player for performance.
Step 4
Flex Builder 3 is set up by default to use version 2 of the Flex SDK. Version 2 compiles code for the Flash Player 9 runtime. Version 3 of the Flex SDK compiles code for the Flash Player 10 runtime, which offers some nice performance increases. You can download the Flex SDK from here (get the Adobe Flex SDK with a stable build with a version of at least 3.2).

You can find more information on using the Flex 3 SDK with Flex Builder here.
Step 5
You’ll need to create some sort of directory structure to house the libraries you have just downloaded. My own personal preference is a structure like the following:
- Development
- Libraries
- alternativa3d_5.5.0 (extract the Alternativa SDK here, and change the version numbers to suit the latest version)
- flex_sdk_3.2.0.3794 (extract the Flex SDK here, and change the version numbers to suit the latest version)
- Libraries
Step 6
In order to make use of version 3 of the Flex SDK you first need to tell Flex Builder where the SDK is. Run Flex Builder and click on Window->Preferences…

Click Flex->Installed Flex SDKs in the left hand menu. Then click the Add button. In the Add Flex SDK dialog click Browse, and select the directory you extracted the Flex 3 SDK to (which will be drive:DevelopmentLibrariesflex_sdk_3.2.0.3794 if you have followed my suggestion in step 5). The name of the SDK will be populated automatically, so you can click OK.

You then want to tick the SDK version 3, which makes it the default SDK for new projects.

Step 7
Click the New button on the toolbar.
![]()
Select Flex Project.

Type in a project name (I’ve used AlternativaTest), leave the Application type as Web Application, and click Next.

Leave the default output folder and click Next.

Click the Library Path tab.

Click the Add SWC button.

Click Browse, open the appropriate SWC file and then click OK. You’ll need to add the three SWC files under the alternativa3d_fp10 directory: Alternativa3D.swc, AlternativaTypes.swc and AlternativaUtils.swc. These will be under drive:DevelopmentLibrariesalternativa3d_5.5.0alternativa3d_fp10 if you have followed my suggestion in step 5.

You should end up with the 3 Alternativa SWC files listed. Now click Finish to create the project.

Step 8
Now we are ready to write some code. But for the purposes of this tutorial we will save time and download some prewritten code. Download the source files (gettingstarted.zip). Extract the contents of the zip file into your project directory. You can find out where Flex has created the project by right clicking on the AlternativaTest icon in the Flex Navigator and selecting the Properties option.

The resource page will then show you the location.
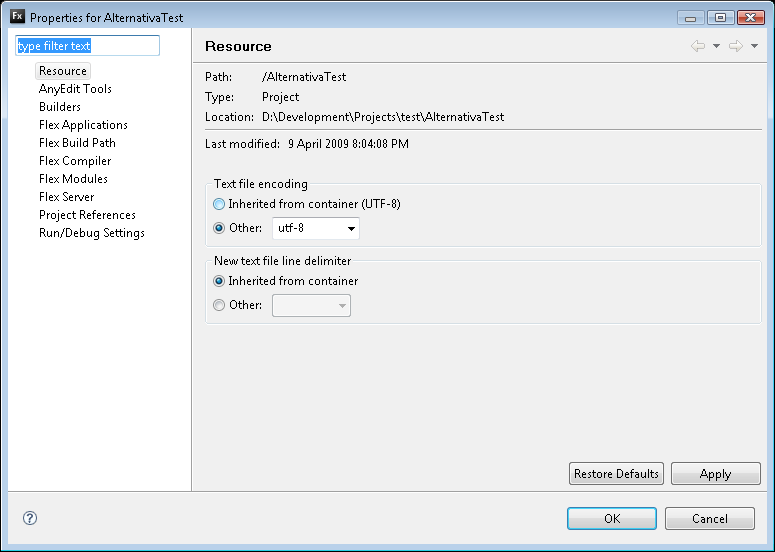
When the zip file is extracted Flex Builder should pick up the new files and show them in the Flex Navigator.

At this point you will have 2 mxml files: Alternativa1.mxml (from the download) and AlternativaTest.mxml (created by Flex Builder with the new project). You want to delete the AlternativaTest.mxml file, so right click on it in the Flex Navigator and click the Delete option. Click Yes to delete it from the file system.

Now right click on the Alternativa1.mxml file and click the Set as Default Application option.
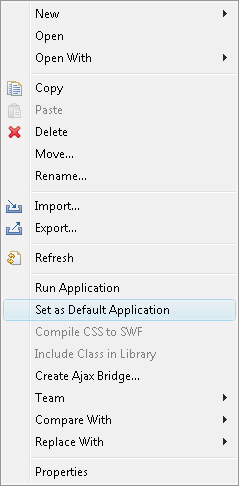
You should get a green triangle and a blue circle on the Alternativa1.mxml file.

Step 9
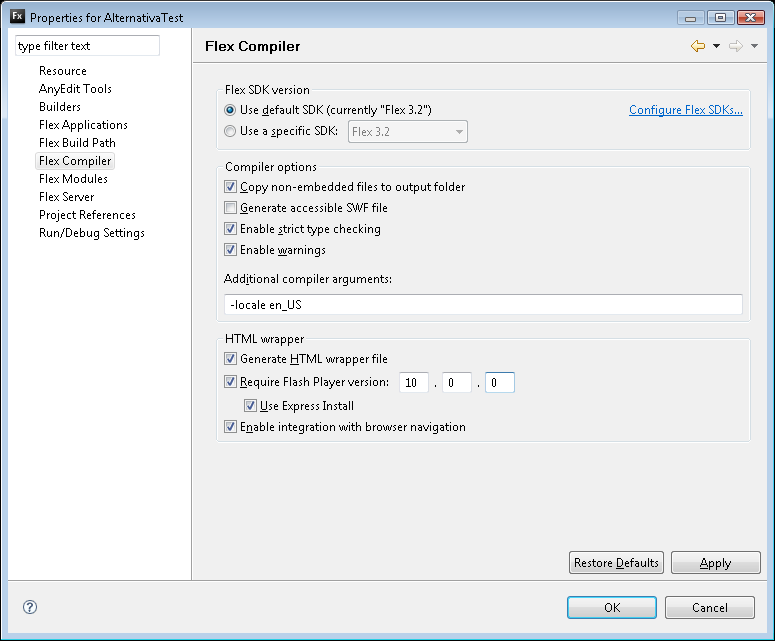
The last change we have to make is to specify the minimum version of the Flash Player that is required to run the application. Right click on the AlternativaText icon in the Flex Navigator and select Properties. Go to the Flex Compiler option in the left hand side. Change the version number where it says Require Flash Player Version to 10.0.0, and click OK.
Step 10
You application is ready to go. Click the green circle with a white triangle in the toolbar to run your Alternativa application.
![]()
Your web browser should open up with the 3D Alternativa Flash application.


