Integrate Flex Builder 3.0 & Php easly with the fresh ZendAMF
by 11 May, 2009 12:30 pm15
In this article I will explain how to build a simple adobe flex application that communicates with php using remote objects calls to the new AMF php implementation supported by adobe and called ZendAMF.
In my example I will use Adobe Flex Builder 3, ZendAMF and a Apache web server with php support and mysql server on windows. If you do not have any available server with php (at least) you will need to install one on your machine. It’s easy, nowadays you have many standalone installers that do everything, just look at the wampserver for example.
Requirements
About ZendAMF:
ZendAMF is a new php implementation of Action Message Format (AMF) that allows Adobe Flex and Flash to talk with php. We could use the amfPHP, but because zend it’s a new one, I will use it. You can download it for free. The version that I will use is the ZendAMF 1.7.8 (zip).
About AMF:
AMF is a binary protocol that uses remote procedure calls to connect adobe flash & flex to many languages server-side and databases.
Getting started!
Some initial notes:
From now on I assume you got the wampserver installed on default path (c:wamp), Adobe Flex Builder 3 and have downloaded the ZendAMF 1.7.8 package (Zip File). To work with ZendAMF you don’t need to use the entire Zend Fframework.
1 – Creating the flex Project:
Just open Flex Builder, goto the menu File, select New and then Flex Project, on the screen it will ask you some informations, just write like me:
Project Name: phpintegration
Project Location: Select Default Project Location
Application type: Select Web Application (Runs in Flash Player)
Server Technology: None
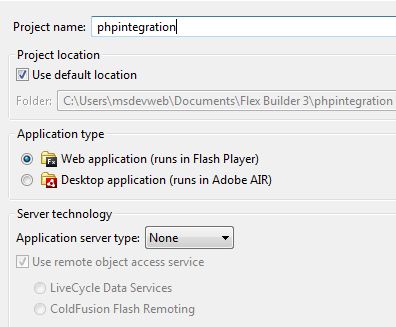
Click Next, and on the following screen leave the default values:
Output folder: bin-debug
Click next, and again on the screen leave all by default, that sould be:
Main source folder: src
Main application file: phpintegration.mxml
Output folder URL: (leave blank)
Click finish, your project is now created. It has nothing special, is just another regular flex project.
2 – Configuring ZendAMF
The next thing to do is to go to your web server htdocs path, if you have installed wampserver on default location should be c:wampwww, and extract here the downloaded zendAMF zip file.
It should now appear a folder on c:wampwww called ZendAMF-1.7.8 open it, then open library folder and copy the Zend folder, go back to the server root (c:wampwww) and paste the Zend folder.
This is all we need, you can leave the extracted ZendAMF-1.7.8 folder, it contains amf documentation, but Zend folder is all we need.
2.1 – Creating ZendAMF php files
In this path (c:wampwww), just create 2 files, one called zend_gateway.php and another called test_class.php
The two files have different functions and code:
zend-gateway.php is our gateway to flex, it means that flex will use this file to «find» all amf classes and our class test_class code.
Just put this code into this zend_gateway.php file:
<?php
 error_reporting(E_ALL | E_STRICT); //optional
 require_once "Zend/Amf/Server.php"; //the zendAMF server
 require_once "test_class.php";  //our test class
 $server = new Zend_Amf_Server(); //declare the server
 $server->setClass("test_class"); //load our test-class
 echo($server->handle()); // needed to start the server
?>
In our test_class.php file we put our class and functions that will be called from flex using a remote object :
<?php
class test_class {
	public function __construct() {
	 //this function is needed, is the constructor of class!!
	}
	public function sayHello($user=NULL) {
	   if($user==NULL) return 'Hello anonymous user! This is php saying hello!';
       else return 'Hello '.$user.'! This is php saying hello!';
    	}
}
?>
3 – Configuring the Flex Builder
When our php code is done, we just need to inform adobe flex compiler that he should identify this gateway (zend_gateway.php) and allow remote calls to it, for that we need to create a services-config.xml file and load it together with the compiler.
To easily do this, on the Adobe flex builder ‘Flex Navigator’ find the src folder and right-click on it, select New, then File and then just write on file name: services-config.xml and click finish. File will now open on flex builder (empty), just write this on it:
<?xml version="1.0" encoding="UTF-8"?>
<services-config>
    <services>
        <service id="amfphp-flashremoting-service" class="flex.messaging.services.RemotingService" messageTypes="flex.messaging.messages.RemotingMessage">
            <destination id="zend">
                <channels>
                    <channel ref="my-zend"/>
                </channels>
                <properties>
                    <source>*</source>
                </properties>
            </destination>
        </service>
    </services>
    <channels>
        <channel-definition id="my-zend" class="mx.messaging.channels.AMFChannel">
            <endpoint uri="http://localhost/zend_gateway.php" class="flex.messaging.endpoints.AMFEndpoint"/>
        </channel-definition>
    </channels>
</services-config>
In this code you will just need to modifiy (if necessary) the uri to your wamp server adress, by default this is correct and not need to be changed.
Save the file! (CTRL+S/ File->Save)
Now all we need to finish configuration is to inform the flex compiler that we have remote services by indicating the file services-config.xml as additional compiler arguments, to do this just go to your Adobe Flex Project, select (if not selected) the phpintegration.mxml file, go to flex builder menu: Project and select Properties, on the window opened, click at left on Flex Compiler, and on the right where is: -locale en_US just add: -services “services-config.xml”
It should now be (like the image):
-locale en_US -services “services-config.xml”

Click ok and wait a few seconds! Flex is configured!
4 – Coding our application
Our application is ready to code, we now need to add a few visual elements to our flex phpintegration.mxml file, in my case I will make a simple panel with a few items and 3 functions, one to call the php function, other to handle a success answer and a third to handle a possible error.
Just add the folowing code to the application:
<?xml version="1.0" encoding="utf-8"?>
<mx:Application xmlns:mx="http://www.adobe.com/2006/mxml" layout="absolute">
<mx:Script>
	<![CDATA[
		import mx.rpc.events.FaultEvent;
		import mx.rpc.events.ResultEvent;
		import mx.controls.Alert;

		private function onSayHelloResult(evt:ResultEvent):void {
			Alert.show(evt.result.toString(),"DONE!");
		}
		private function onError(err:FaultEvent):void {
			Alert.show(err.message.toString(),"ERROR!");
		}
		private function callZend():void {
			zendAMF.sayHello.arguments.user=userName.text;
			zendAMF.sayHello();
		}
	]]>
</mx:Script>
	<mx:Panel width="361" height="222" layout="absolute" title="Adobe Flex and PHP integration using ZendAMF" horizontalCenter="0" verticalCenter="0">
		<mx:Label x="26" y="53" text="Enter your name : "/>
		<mx:Label x="144" y="90" text="AND"/>
		<mx:TextInput x="144" y="51" id="userName"/>
		<mx:Button x="26" y="122" label="Call php sayHello() function!" width="278" click="callZend()"/>
	</mx:Panel>
	<mx:RemoteObject id="zendAMF" destination="zend" showBusyCursor="true" source="test_class">
	<mx:method name="sayHello" result="onSayHelloResult(event)"  fault="onError(event)">
			<mx:arguments>
				<user>
					{null}
				</user>
			</mx:arguments>
		</mx:method>
	</mx:RemoteObject>
</mx:Application>
It’s done!! Wou will get something like the image:
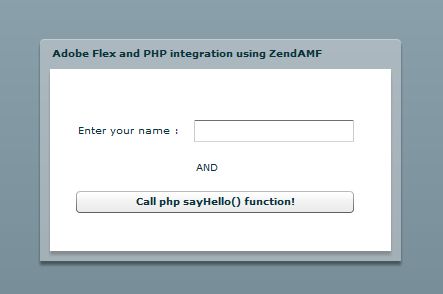
Just run the application and write your name on the text field (or leave blank) and press the button, if everything went good, you will get an alert with the one of the messages:
Hello anonymous user! This is php saying hello! If you did not write anything on the input field
or
Hello ‘name on the text field’ user! This is php saying hello! If you write something on the text field.
Let me explain the code step by step:
import mx.rpc.events.FaultEvent;
import mx.rpc.events.ResultEvent;
import mx.controls.Alert;
These are the needed imports to handle the events dispatched by the remote Object.
private function onSayHelloResult(evt:ResultEvent):void {
			Alert.show(evt.result.toString(),"DONE!");
		}
Called when the remoteObject receives an answer from the zendAMF (php return)
private function onError(err:FaultEvent):void {
			Alert.show(err.message.toString(),"ERROR!");
		}
Called when an error ocours, on the zendAMF server or the remoteObject.
private function callZend():void {
			zendAMF.sayHello.arguments.user=userName.text;
			zendAMF.sayHello();
		}
Function called by the button, on the fisrt line it defines the argument user with the text contained in the field userName. After that it calls the method from the remote object, that will call the same name function on the php class.
And finaly, the remote object:
<mx:RemoteObject id="zendAMF" destination="zend" showBusyCursor="true" source="test_class">
	<mx:method name="sayHello" result="onSayHelloResult(event)"  fault="onError(event)">
			<mx:arguments>
				<user>
					{null}
				</user>
			</mx:arguments>
		</mx:method>
	</mx:RemoteObject>
In here we define several things, on the remoteObject tag we define his id as zendAMF, indicating the zend destination (defined in the services-config.xml file loaded as compiler argument), we make it show the busyCursor during the call, and we define the destination class, that is our class name test_class.
On bottom, we define one method for each class function with the same name that our php function has, in this case we just need to call our sayHello function, defining it as is name: name=”sayHello”, we define also the function that will be called when the method responds, named onSayHelloResult, and also the function called when an error ocours, named onError. After that are named the arguments, should be placed by the same order that the php function have. In this caso is just one.
Well, that’s all.
Note
The zip archive FlexPHPSourceFiles.zip contains the flex project (phpintegration.zip) and the zendAMF path files (zendAMF.zip that containes zend_gateway.php and test_class.php)
In a future tutorial i will teach how to make a simple contact manager with all CRUD (Create, Read, Update and Delete) Operations using ZendAMF.


