Build a Creative “Swirl Animated Menu” with Flash CS4
by 1 July, 2009 1:00 pm17
Flash it’s a powerful application and can be really complex, but even beginners can create a cool menu for demonstration or for use in a personal site. The menu that we will create is simple, but the swirl animation is something that you don’t see everywhere, for that I’ve decided to explain one way to make an animation of growing swirls without any Action Script code.You will also learn how to import artwork from illustrator where I’ve pre-made the graphics, the work is very simple and the result will be very cool.
Final Result
The final result of this tutorial is a growing swirl effect in a simple menu, take a look.
Pre-Requisites
We will use a Adobe Illustrator file that I’ve made with the graphical elements. Grab it here and don’t worry if you don’t work with Illustrator, you do not need to open it.
You will need Flash CS4 (but it will work also in previous versions).
You should feel fine about developing in Adobe Flash and Action Script 3.
Step 1 – Setup Flash Environment
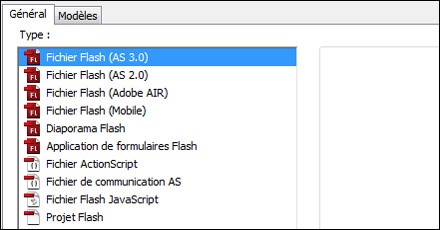
The very first thing is to create a new Action Script 3 Project! Please ignore the OS in French, this is how I work. The things should be easy to follow.
On properties, change the dimensions to:
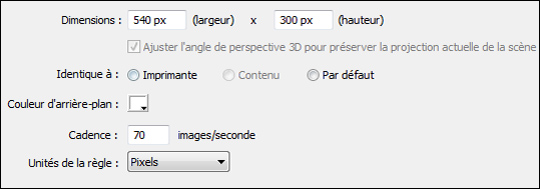
In here setup the speed to 70 frames/second to make the animation faster. We got now our flash stage prepared, now is time to work, but before save it as menu.fla.
Step 1 – Import Illustrator artwork into Flash
If you do not work with illustrator you should! Illustrator it’s a great tool, not only for print design, but also for web. One of the cool features is the possibility to transform illustrator elements into movie clips without exit illustrator. In our case, this is already done, so you do not need to open the menuBig.ai file, just download the zip file and extract it to any place.
Go to flash menu File, then select Import and Import into stage (CTRL+R) and browse to the location where you have extracted the Illustrator menuBig.ai file, then select it and choose Open. A new window will now open with all of illustrator elements, and if you take a closer look, you will find all elements with movie clips icon’s, these are the converted artwork from illustrator, so, select all the elements like this:
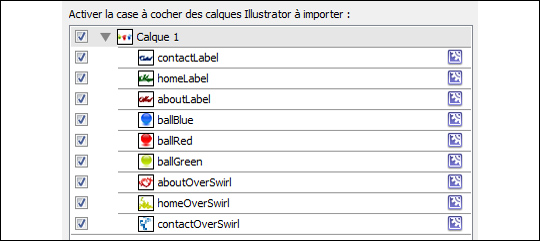
Now click OK, the artwork should be placed correctly into the stage, like this:
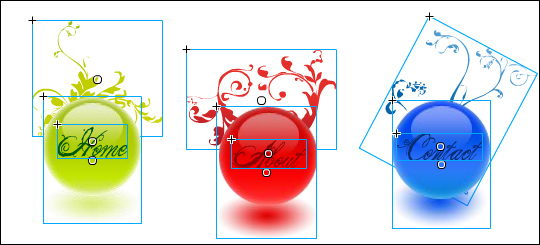
So, everything is ready to use.
Step 2 – Isolate each button elements.
We need to isolate each button because each one is different, for that follow these steps:
- Select the Green button circle, the green swirl and the Home label. (to select more that one element press shift while selecting)
- Right-Click on those elements, and select Convert to Symbol.
- Name the Movie Clip myButtonGreen and click ok.
Repeat these 3 steps for both red and blue elements but on the third one, change the name to myButtonRed for the red one and myButtonBlue for the blue one.
Now each button elements are on his own Movie Clip.
The next thing to do, is to name each button instance, this is extremely important! Click on each button, go to to panel properties, and on the instance name write myButtonGreen, myButtonRed and myButtonBlue on each one of the buttons. This will allow us to access them via action script.
Step 3 – Distribute the menus to layers.
Now that we have all the artwork successfully imported into the stage, each button is created and for clean organization we will need to separate all the things into layers, that process is very easy, will all selected (CRTL+A), Right-Click on one of the menu items and select Distribute to Layers, that will create some new layers with separated artwork, like these ones:

This will give us more control on each element.
The next thing to do is to create on each swirl an animation. This is the next step
Step 4 – Creating the growing animation
This animation almost impossible to achieve in action script code, so the work should be made in pure frame-by-frame animation. We will create a mask that will show is contents along with some few frames. We could create a rectangle to mask, put it outside the swirl area and making it move over the swirl to make it appear… but that is to much automatic, so we need to make it seems more real, but how to do this?
Easy! Instead the rectangle, we will use the pencil with a small circular brush. Let me explain.
First, we will start with the green button. Double click on it and then double click on the swirl Movie Clip. Now you can see the full swirl in an unique layer right?
Create now a new layer and name it mask. With this layer selected go to the tools panel and select the pencil tool, the one on the small picture here. ![]()
Then go bottom on the tools panel, and on the pencil size, choose the third one counting from top.
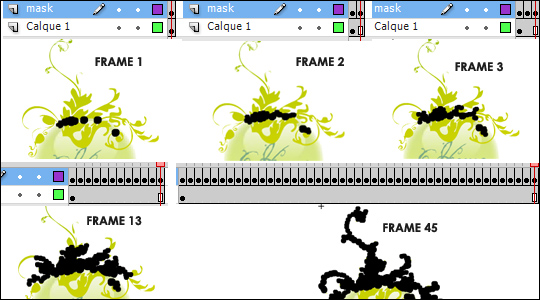
Now on the selected layer click with mouse to draw a point over the swirl near the button green limits, on a “visible area”, i mean on the area that will be visible on the swirl, because some parts of the swirl will be behind the green circle we do not need to mask them (if you cannot see well the circle limits make a zoom on stage to 200%), after that create a new keyframe on this layer and put one or two new “brush points”, create a third layer and continue with the same steps and some more “brushes points” to cover all the “visible” swirl area, you can guide yourself by the back green circle. I will explain the first three steps, then the middle and the final completed mask elements. This mask fill should be made progressive to demonstrate the grow effect.
Se what I’m talking about:
Step 5 – Creating the fade-out animation
Now we will create a fade-out transition next to the last frame (on my case the frame 46), create a keyframe on the bottom layer on frame 46 (or on your case the last one) then on the frame 56 create a new keyframe.
Now right-click on one of the middle frames, one between frame 46 and 56 and select Create Classic Animation, a arrow will fill the frames, like this:

Now we need to put the alpha equal to 0 on our swirl clip on the final frame, just click on the last frame, then click on the swirl movie clip the go to right panel, color effects and select style as alpha. Choose 0%.
Our clip has now also a fade-out effect, just need to extend also the mask to it, for that click on frame 56 from the mask layer and insert a keyframe there (F6). Now our animation is complete, just need to avoid that the grow and fade out animation starts. Just create a new layer on top of them, name it actions and insert 3 keyframes, one on the first frame and other on the frame before the fade-out animation (in this case 45) and the last one at the frame 46. Click on the first frame and go to actions panel and just write:
stop();
Do the same thing at the frame 45 on the layers action. It’s almost done.
The last thing to do is to make this swirl invisible to the first frame (i don’t want it to be visible at start, just on Mouse Over action) so, Click on the first frame of the mask, then press SHIFT key and then click the last frame of the bottom layer (where is the swirl), this will select the 2 layers frames. Now drag the mouse to your right till the frames are positioned on frame 2, this will insert a empty frame at the beginning on both layers that will make the swirl and the mask invisible at first frame that is what we want, it should stay stopped there (stop();) and showing nothing (empty frames). He should only show the grow animation when we send it to play at frame two, and the fade-out animation when we send it play the frame 47 (48 because we moved all the stuff one frame right). Click on the frame 47/48 on the layer actions and name the frame “fade” (without the “” ). With this we will be able to call the gotoAndPlay(“fade”) to fadeout the swirl.
Finally, Right-Click the layer mask and select Mask.
Check if all the layers are similar:

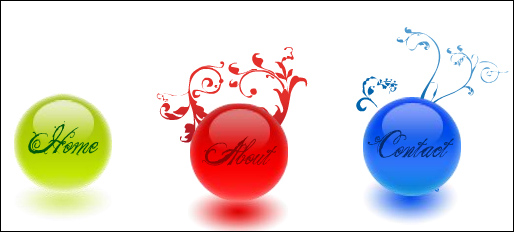
Swirl animation it’s done! If you run the application, it will remain as this:
Step 6 – Create how many menu items you want
Because we got 3 menu items, you will need to do the same animation procedure to both Red an Blue items, the same “Step 4” steps, is not mandatory the number of frames to be equal, but longer the frame animation, longer the animation smooth effect. Remember, enter the clip, then enter the swirl clip, create a layer mask, draw the progressive mask effect, create a fade-out, create a layer actions, make them stop at the correct layers, move them to right one layer, name the fade layer as “fade” and save all this.
The procedure is the same for how many menu items you want even if in my case I’ve only used 3.
Now we got all this ready to rock, but because i want the click area be only the size of the circle, we need to do something about it, that lead us to the next step.
Step 7 – Preparing the menu items.
Because i want that the label color changes when the user put the mouse over, i need to create a second state for each label, i will explain the first and then you do the other two. First thing to do is to double click on the buttonGreen, then double click again in the label home. You are now inside label home movie clip. Transform the “Home” text into a new movie clip called home, then on the same layer create a keyframe on the second frame. The label movie clip will be automatically copied, now just need to click on the “About” in the second frame, the go to right panel and on color effects choose tint and choose a white color. It’s done!
Just one more thing, add a second layer on top name it actions and write on it:
stop();
Do this step in buttonAbout and buttonContact.
Now we need to make a circle with the same area as the button circle; Exit the label movie clip, and create a new layer on top, name it buttonBack, and draw a circle with the ellipse tool over the green circle without border color, something like this:

Then convert it to movie clip and name it buttonBack, then name the instance name as buttonBackGreen.
Go to right panel and make his style as alpha at 0%. This will serve as button, and it’s important that his instance name is buttonBackGreen.
Got to the other buttons and make the same process, create a new layer and this time import the buttonBack movie clip from the library, and put it over the button and name it buttonBackRed and buttonBlackBlue on both buttons and with alpha at 0%.
Well, our buttons are ready to be animated. Go back to main stage and name the greenButton instance as: btnGreenBig, the red as btnRedBig and the blue one as btnBlueBig.
Step 8 – Create a status area
On any of those layers create a dynamic text field and name his instance Mstatus. This will show our menu mouse interactions, like Over, Out or Click. This is not very important but to make it similar to mine do it anyway.
Step 9 – Writing some code
This is the final step, just use the empty layer that already exists in main stage, drag it to top of all layers, name it actions:

Now write this code on the layer actions:
loadButtons(); //load the listeners

function loadButtons():void {
	btnGreenBig.buttonBackGreen.useHandCursor=true;
	btnGreenBig.buttonBackGreen.buttonMode=true;

	btnRedBig.buttonBackRed.useHandCursor=true;
	btnRedBig.buttonBackRed.buttonMode=true;

	btnBlueBig.buttonBackBlue.useHandCursor=true;
	btnBlueBig.buttonBackBlue.buttonMode=true;

	btnGreenBig.buttonBackGreen.addEventListener(MouseEvent.MOUSE_OVER, onMouseOver);
	btnGreenBig.buttonBackGreen.addEventListener(MouseEvent.MOUSE_OUT, onMouseOut);
	btnGreenBig.buttonBackGreen.addEventListener(MouseEvent.CLICK, onMouseClick);

	btnBlueBig.buttonBackBlue.addEventListener(MouseEvent.MOUSE_OVER, onMouseOver);
	btnBlueBig.buttonBackBlue.addEventListener(MouseEvent.MOUSE_OUT, onMouseOut);
	btnBlueBig.buttonBackBlue.addEventListener(MouseEvent.CLICK, onMouseClick);

	btnRedBig.buttonBackRed.addEventListener(MouseEvent.MOUSE_OVER, onMouseOver);
	btnRedBig.buttonBackRed.addEventListener(MouseEvent.MOUSE_OUT, onMouseOut);
	btnRedBig.buttonBackRed.addEventListener(MouseEvent.CLICK, onMouseClick);
}

//the glow filters to apply the swirl
var glR:GlowFilter = new GlowFilter(0xcc0000,1,50,50,2.5);
var glG:GlowFilter = new GlowFilter(0x91e600,1,50,50,2);
var glB:GlowFilter = new GlowFilter(0x0033ff,1,50,50,3.5);

//mouse over handler
function onMouseOver(evt:MouseEvent):void {
	switch(evt.currentTarget.name) { //this is one way to find if the mouseOver is dispatched from the buttonBack MC
		case "buttonBackGreen":
			btnGreenBig.homeOverSwirl.gotoAndPlay(2); //animate the swirl grow
			btnGreenBig.homeLabel.gotoAndStop(2); //put the label on white
			btnGreenBig.homeOverSwirl.filters=[glG]; //applay filters to the swirl
			Mstatus.text="mouseOver Home!"; //update button status text
			startTimer(btnGreenBig); //start the timer to animate the cricular move of button
		break;
		case "buttonBackBlue":  //same as on the green button
			btnBlueBig.contactOverSwirl.gotoAndPlay(2);
			btnBlueBig.contactLabel.gotoAndStop(2);
			btnBlueBig.contactOverSwirl.filters=[glB];
			Mstatus.text="mouseOver Contact!";
			startTimer(btnBlueBig);
		break;
		case "buttonBackRed": //same as on the green button
			btnRedBig.aboutOverSwirl.gotoAndPlay(2);
			btnRedBig.aboutLabel.gotoAndStop(2);
			btnRedBig.aboutOverSwirl.filters=[glR];
			Mstatus.text="mouseOver About!";
			startTimer(btnRedBig);
		break;
	}
}

//mouse out handler
function onMouseOut(evt:MouseEvent):void {
	switch(evt.target) { //this is another way to check if the event is dispatched from buttonBack MC
		case btnGreenBig.buttonBackGreen:
			btnGreenBig.homeOverSwirl.gotoAndPlay("fade"); //play the fade effect
			btnGreenBig.homeLabel.gotoAndStop(1); //return label to his original color
			Mstatus.text="mouseOut Home!"; //update status text
			stopTimer(btnGreenBig); //stop the circular move
		break;
		case btnBlueBig.buttonBackBlue: //sabe as green button
			btnBlueBig.contactOverSwirl.gotoAndPlay("fade");
			btnBlueBig.contactLabel.gotoAndStop(1);
			Mstatus.text="mouseOut Contact!";
			stopTimer(btnBlueBig);
		break;
		case btnRedBig.buttonBackRed: //sabe as green button
			btnRedBig.aboutOverSwirl.gotoAndPlay("fade");
			btnRedBig.aboutLabel.gotoAndStop(1);
			stopTimer(btnRedBig);
			Mstatus.text="mouseOut About!";
		break;
	}
}

//click handler
function onMouseClick(evt:MouseEvent):void {
	switch(evt.currentTarget.name) {
		case "buttonBackGreen":
			Mstatus.text="mouseClick Home!";
		break;
		case "buttonBackBlue":
			Mstatus.text="mouseClick Contact!";
		break;
		case "buttonBackRed":
			Mstatus.text="mouseClick About!";
		break;
	}
}

/***circular animation ***/
var distance:Number = 0.4; //circular distance
var speed:Number=20; //more hight, less speed

//button timers to do the circular move
var time:Timer = new Timer(speed); //green one
var timerBlue:Timer = new Timer(speed); //blue
var timerRed:Timer = new Timer(speed); //red
//listeners to update button position
time.addEventListener(TimerEvent.TIMER, moveCircle);
timerRed.addEventListener(TimerEvent.TIMER, moveRed);
timerBlue.addEventListener(TimerEvent.TIMER, moveBlue);

//current rotation angle position
var angle:Number=0;
var angleB:Number = 0;
var angleR:Number = 0;

//green circular function
function moveCircle (e:TimerEvent):void {
	btnGreenBig.x = btnGreenBig.x + (Math.cos(angle) * distance);
	btnGreenBig.y = btnGreenBig.y + (Math.sin(angle) * distance)
	angle += 0.1;
}

//red circular function
function moveRed (e:TimerEvent):void {
	btnRedBig.x = btnRedBig.x + Math.cos(angleR) * distance;
	btnRedBig.y = btnRedBig.y + Math.sin(angleR) * distance;
	angleR += 0.1;
}

//blue circular function
function moveBlue(e:TimerEvent):void {
	btnBlueBig.x = btnBlueBig.x + Math.cos(angleB) * distance;
	btnBlueBig.y = btnBlueBig.y + Math.sin(angleB) * distance;
	angleB += 0.1;
}

//start timer/circular anim on the provided movieclip.
function startTimer(it:MovieClip):void {
	if(it==btnGreenBig) time.start();
	if(it==btnRedBig) timerRed.start();
	if(it==btnBlueBig) timerBlue.start();
}
//stop timer/circular anim
function stopTimer(it:MovieClip):void {
	if(it==btnGreenBig) time.stop();
	if(it==btnRedBig) timerRed.stop();
	if(it==btnBlueBig) timerBlue.stop();
}
Well, this code is enough.
Step 10 – Finishing our application
Change background color to black then save and run the project! This step is quite simple!
Nice ah?
Final considerations!
Take some time to read the code, I’ve made some comments that will help you out.
Some of the code could be even more simplified, but i did not do that because this way the things get easy to understand. The timer could be replaced by a Enter Frame event but some times that will overload the menu, these three timers can be replaced only for one, saving you a few lines of code, but this is your work right?
Hope you like it! And again! Don’t forget to follow us on twitter and subscribe to our RSS feed!


